Mobile Accessibility 101: Mobile Screen Readers
![]() May 25, 2018
May 25, 2018
We’re kicking off our mobile accessibility series with a comparison of the TalkBack (Android) and VoiceOver (iOS) screen readers. Next, we’ll cover the basics of mobile accessibility for fonts and colors, then mobile switch controls, followed by a mobile testing method for each popular operating system. Welcome aboard, and we hope you enjoy the ride!
TalkBack vs. VoiceOver
It has been several years since sales of smartphones and other mobile devices first surpassed sales of traditional desktop computers. More than half of global Internet traffic comes from mobile devices.
Apple iOS started to implement out-of-the-box accessibility features fairly early on, and VoiceOver was introduced with the iPhone 3GS in 2009. Google lagged behind a bit when it came to including its own screen reader, TalkBack, in the Android operating system by default. Because of the early accessibility features on iPhones, as well as the fact that the hardware is very consistent (versus the multitude of devices that could run various versions of the Android operating system), iOS became an early leader in mobile accessibility. Not surprisingly, it became the go-to platform for most people interested in accessibility features.
I started to explore mobile usability both out of personal interest and as an extension of the work I was already doing to learn and implement accessibility on desktops. At the time, I wasn’t a Mac user at all, so I thought it made more sense to go with Android rather than iOS. Even though I had played around with (other people’s) iPhones and seen other people using VoiceOver, my first smartphone was an Android.
When I first started to use TalkBack, I felt pretty awkward. I would slowly follow the green focus outline around the page and fumble my way through the different gestures. It took me a little while to find the proper rhythm, to differentiate between a “slide” and a “swipe,” and to learn the multipart gestures. For me, some of the difficulty was in mastering the timing, since a slide and a swipe are functionally the same, and the only difference between them is the speed of the gesture. (This is analogous to “slide”/”swipe” vs “flick” on iOS with VoiceOver.) Even so, I still fail to get the proper result for some of the more complicated ones about 30% of the time.
What helped me most was learning that when using TalkBack, most of the gestures involve a single-finger tap, flick, or right-angle L-shaped movement. All standard multi-finger smartphone gestures still work while TalkBack is running, but some of the usual single-finger gestures now are performed with multiple fingers. Take scrolling, for example. With TalkBack on, scrolling a web page is a two-finger touch and slide, upgraded from the familiar single-finger gesture. Pinch gestures, because they already use two fingers, work the same regardless of whether or not TalkBack is running. This gave me an easy pattern to follow.
In addition, TalkBack’s focus on single-finger gestures makes it easier to use than VoiceOver by those who are using a single hand to hold and operate the phone, as well as by people with reduced manual mobility or dexterity who might have issues with gestures involving multiple fingers.
Getting Started with TalkBack
To turn on TalkBack, go to the “Accessibility” option under “Settings.” There’s also an option you can enable to toggle TalkBack on and off, along with a lot of other accessibility options.
If you are familiar with iOS, you might expect to see something here that will allow you to adjust the TalkBack settings. The TalkBack settings are actually available from the Global Context menu, which you can access while TalkBack is on by making an L-shaped gesture down and to the right.
From the TalkBack settings, you can access a tutorial for learning and practicing the gestures, which I found very useful.
TalkBack/Android Gestures
| Gesture | Action |
|---|---|
| Touch/single tap | Read element |
| Double-tap | Activate element |
| Swipe-right | Move to next element |
| Swipe-left | Move to previous element |
| Two-finger slide up/down | Scroll |
| Triple-tap | Zoom |
| Slide up-down | Jump to the first item on the screen |
| Slide down-up | Jump to the last item on the screen |
| Slide left-right | Scroll up one screen |
| Slide right-left | Scroll down one screen |
| Slide up-left | Return to the home screen (from anywhere) |
| Slide down-left | Activate the back button (browser only), close app (apps only) |
| Slide up-right | Opens the local context menu (options depend on where you are) |
| Slide down-right | Opens the global context menu (includes TalkBack settings) |
Of all of the TalkBack gestures, the L-shaped gestures are the ones that I have the most difficulty with. I tend to make them too large and slow, so I inevitably “select” a screen element rather than return to the home screen or open one of the context windows.
When I finally got an iOS device, these habitual gesture patterns I relied on actually made it a little bit harder for me to learn and remember the VoiceOver gestures. Only the most basic gestures are the same on both platforms: single-finger gestures to select, activate, and move one element to the right or left.
VoiceOver makes extensive use of multi-touch and multi-fingered flicks, taps, and twists for its interface, as opposed to the single-finger TalkBack gestures, which means a wider variety of commands can be accessed quickly. However, the variety comes with a price, as it might limit what people are able to do with VoiceOver if they have mobility or dexterity issues.
Getting Started with VoiceOver
You can turn VoiceOver on by going to “Settings” > “General” > “Accessibility” > “VoiceOver”. You can also access the VoiceOver tutorial, as well as the VoiceOver settings, from there as well.
VoiceOver/iOS Gestures
| Gesture | Action |
|---|---|
| Touch/single tap | Select and read the element |
| Double-tap | Activate the selected element |
| Swipe-right | Move to next the element |
| Swipe-left | Move to previous the element |
| Swipe up or down | On an adjustable element like a slider, this increments or decrements the value. In text view, this moves the insertion point backwards or forwards. |
| Double press: with one finger, perform a double tap. During the second tap, continue to hold your finger against the screen. | Drag the selected item |
| Two-finger tap | Pause/resume reading |
| Two-finger swipe up | Read all accessible items from the top of the screen |
| Two-finger swipe down | Read all accessible items from the current position |
| Two-finger pinch open/closed | Select/deselect text |
| Three-finger swipe up/down | Scroll screen up/down |
| Three-finger swipe left/right | Navigate to the next/previous page |
| Three-finger double tap (if zoom is enabled, this becomes a three-finger triple tap) | Toggle speech |
| Three-finger triple tap (if zoom is enabled, this becomes a three-finger quadruple tap) | Toggle screen curtain |
| Four-finger tap at the top or bottom of the screen | Select the first or last accessible element on the screen |
Both TalkBack and VoiceOver allow people to open menus that offer shortcuts to various settings and controls. TalkBack has two: the local context menu and the global context menu. The global context menu is available across all applications and contains commands that work everywhere, as well as general TalkBack settings. The contents of the local context menu vary, and are specific to whatever application is currently active.
VoiceOver has the rotor, a circular single context-sensitive menu of commands. (The VoiceOver rotor is also available on the Mac desktop.) You can open the rotor by placing two fingers on the screen and twisting slightly, like turning a knob. You can also place one finger on the screen and drag another finger around it, though this method requires the use both hands. I find this easier, by far, than opening the local or global context menus. And I like that there is only a single rotor, from which you can access all of your selected shortcuts.
Once the rotor is open, you click through the available options by continuing to twist. I haven’t yet found a way to avoid making this feel awkward when operating with one hand, though the split-tapping option available in VoiceOver does allow both hands to be used, which makes things easier for me.
There are two viewing options for the TalkBack context menus; a circular display, which is very reminiscent of the VoiceOver rotor, and a list display. I prefer the list display, where I can read the full list of available options and easily swipe from one to the other. For sighted users, the rotor has a visual display, but it only displays the current active rotor option, so you won’t know what you can get to until you actually rotate through all of the options.
Something that iOS offers screen reader users that Android does not is the ability to blank out the screen for privacy and security reasons. The Screen Curtain option with VoiceOver completely blanks out the screen without impacting the user interaction at all. Up until recently, Android didn’t offer anything this, and while users could reduce the screen brightness, this was not really a substitute for something like Screen Curtain, since the screen brightness on a phone or tablet will never reach 0%.
However, recently Android has introduced Dark Screen, which is their equivalent of Screen Curtain. While I’ve tried both Screen Curtain and Dark Screen, I haven’t used either very much; as a sighted user I don’t feel confident enough using solely a screen reader, so I rely on being able to see the screen and what I am doing.
Which is Better?
Having used both TalkBack on Android and VoiceOver on iOS, which is better? In my opinion, both are good options.
VoiceOver gestures are fixed and universal, so moving from one device to another is seamless. The same applies to TalkBack out of the box, but there you also have some control with regards to assigning specific gestures to various commands. All iOS devices have the same basic layout, while Android devices are much more varied, depending on the manufacturer. However, because of this, Android devices do have greater potential for expansion and upgrade options.
In my case, I tend to prefer TalkBack on Android for the simple reason that I’ve used it the longest and it’s most familiar to me. Everyone will have their own unique needs and preferences when it comes to working with mobile accessibility options—but taking the time to learn about what’s available will help you design and create mobile experiences that work for all of us.
The Forrester Wave™: Digital Accessibility Platforms, Q4 2023
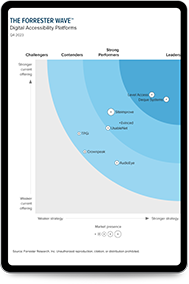
The first-ever digital accessibility Forrester Wave provides objective analysis of the most significant solution providers, recognizing Level Access as a Leader.
Access the reportSubscribe for updates